It’s a familiar story for many orchid owners: your plant looked stunning when it first arrived—graceful arching stems, glossy leaves, and blooms that seemed almost too perfect to be real. And now, months later, the flowers have faded (which is completely normal)… but the leaves are also looking limp, wrinkled, or even slightly yellow. When orchids start drooping, it’s a sign something deeper is going on beneath the surface.
The good news? Droopy leaves are rarely permanent. Orchids are incredibly resilient when their needs are understood, and with the right adjustments you can help yours bounce back and even encourage healthier future blooms.
Below is a complete guide to what causes sagging leaves—and exactly how to fix them.

Why Orchid Leaves Droop in the First Place
While orchids naturally enter a resting phase after blooming, their leaves should remain firm, hydrated, and bright green. When the foliage begins to wilt, fold, or discolor, the issue almost always traces back to moisture—either too much or too little.
Orchids are sensitive plants with roots that act like sponges. They absorb water quickly, but they also need plenty of air circulation. When watering habits or potting conditions go off balance, the roots show damage first—and the leaves follow soon after.
Signs You’re Overwatering
Overwatering is one of the most common mistakes with orchids. It often shows up as:
- Leaves turning yellow, mushy, or droopy
- Soil that stays damp or soggy
- Roots that look brown, black, squishy, or stringy
Orchid roots need oxygen just as much as they need moisture. If they sit in waterlogged soil, they suffocate, and the damaged roots can no longer carry water to the leaves—causing them to collapse even while the soil is wet.
Signs You’re Underwatering
On the opposite end of the spectrum is dehydration, which leads to:
- Wrinkled, folded, or thin leaves
- Dry, brittle roots that appear gray or silver
- A potting mix that dries out too quickly
In this case, the plant simply doesn’t receive the moisture it needs, and the leaves lose firmness as the plant pulls water inward to survive.
How to Confirm the Problem
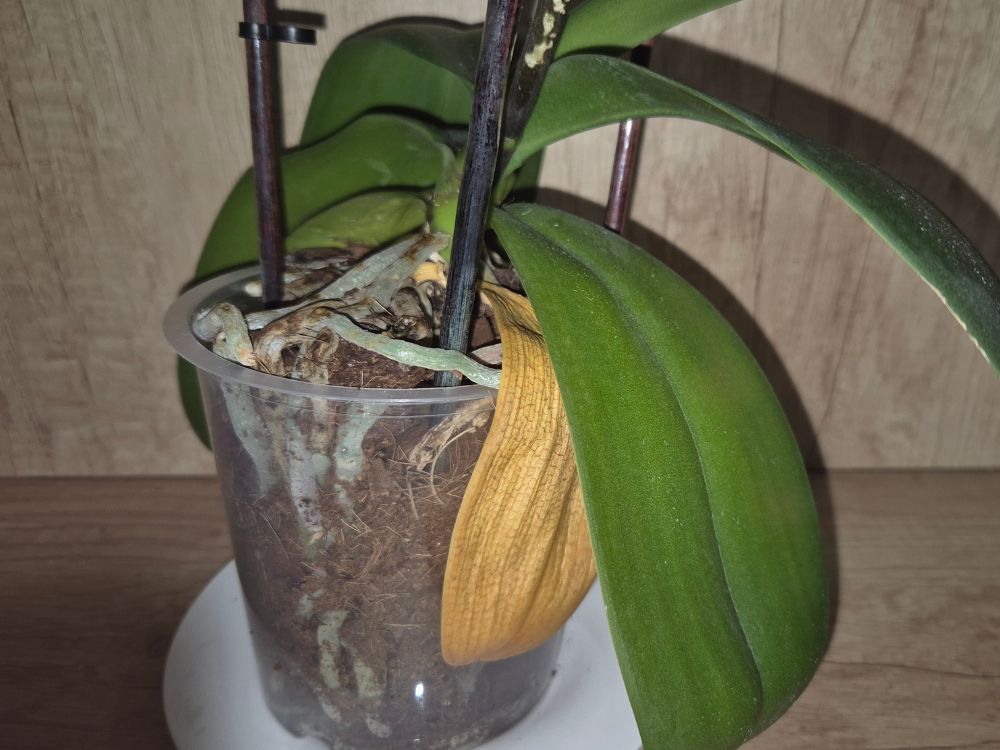
If you’re unsure which issue you’re dealing with, the simplest solution is to gently remove the orchid from its pot and inspect the roots directly.
- Healthy roots: firm, plump, white or vibrant green
- Overwatered roots: soft, mushy, dark, or foul-smelling
- Underwatered roots: brittle, shrunken, papery
Once you know what’s happening below the surface, you can fix the problem confidently.
How to Fix Droopy Orchid Leaves From Overwatering
If your plant’s roots are mushy and waterlogged, you’ll need to intervene right away.
Trim the Rot
Use clean, sharp scissors or shears to snip away any roots that are dark, wet, or collapsing. It may feel alarming to remove so much, but trimming the damaged areas gives the plant a chance to rebuild healthy new growth.
Refresh the Potting Mix
Dump out the old, soggy soil and repot the orchid using a fresh, airy, orchid-specific mix—typically bark chips, perlite, or sphagnum moss. These materials encourage airflow around the roots, preventing water from collecting in one spot.
Choose a Pot With Proper Drainage
Clear plastic pots are ideal because they allow light to reach the roots and make it easy to monitor moisture. Make sure the pot has multiple drainage holes to prevent water buildup.
How to Fix Droopy Orchid Leaves From Underwatering
When the problem is dryness, the goal is to rehydrate the roots gently and gradually.
Rinse and Trim
Shake off the dry soil and rinse the roots with room-temperature water. Remove any dead or hollow sections of root. If the flower spike on top has fully dried out, you can trim it back as well so the plant focuses its energy on root recovery.
Give the Roots a Hydration Bath
Place the orchid roots (without the pot) in a shallow bowl of water for about 10–20 minutes. Submerge the roots about two-thirds of the way—there’s no need to soak the entire plant. Tap water is usually fine, but letting it sit out overnight helps dissipate chlorine.
Repot in Fresh Mix
Once rehydrated, repot the orchid in new soil designed for orchids. This helps the plant maintain steady moisture without drowning.
What to Do About Yellow or Brown Leaves
Droopy or discolored leaves are a symptom—not the problem itself. After fixing your plant’s hydration issues, the leaves won’t turn green again, but they don’t necessarily need to be removed.
- Yellowing leaves: Leave them alone. They will fall off naturally as the plant stabilizes.
- Fully brown, dry leaves: You can trim these away carefully so the plant doesn’t waste energy trying to revive dead tissue.
New, healthier growth will eventually replace these leaves once the plant is back in balance.
How to Prevent Droopy Leaves in the Future
Once your orchid has recovered, a few simple habits will keep it looking vibrant:
Water the Right Way
Water when the potting mix is almost dry—not fully dry and not constantly wet. Most orchids need watering every 7–10 days, depending on your home’s humidity and the potting material.
Check Moisture With Your Fingers
If the top of the potting mix feels cool or slightly damp, wait a day or two. If it feels dry and papery, it’s time to water.
Give Roots Plenty of Air
Always use breathable, chunky potting mix rather than regular potting soil. Dense soil suffocates roots and leads to rot.
Keep Light and Temperature Consistent
Bright, indirect light (near an east- or north-facing window) and moderate indoor temperatures help orchids stay stable while recovering from stress.
Droopy orchid leaves don’t automatically mean your plant is dying—only that it’s trying to tell you something about its care. Whether your orchid has been sitting in too much water or struggling through a dry spell, a little root maintenance and a fresh start in new soil can make all the difference.
With steady watering habits and better airflow around the roots, your orchid can return to its firm, glossy, vibrant self. And while the damaged leaves won’t reverse, the plant will reward you with new growth and, eventually, a beautiful flush of blooms once again.